Salt la conținutul principal

Cum să copiați o întâlnire într-o altă zi în calendarul Outlook?

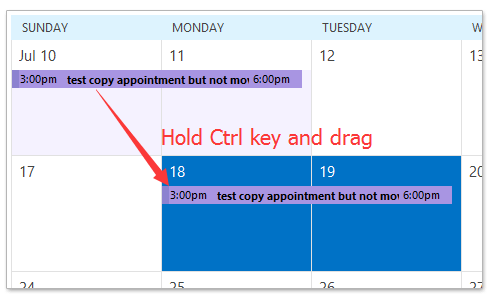
În calendarul Outlook, am încercat să copiez o întâlnire într-o altă zi prin copiere și lipire. Cu toate acestea, doar subiectul programării a fost copiat după cum se arată în imaginea de mai jos. Dar trebuie să copiez întreaga întâlnire, cu excepția datei de începere / sfârșit, aveți idei?


Copiați o întâlnire într-o altă zi în calendarul Outlook cu tasta Ctrl

În Calendar din Outlook, selectați programarea pe care o veți copia, trageți-o într-o altă zi ținând apăsat butonul Ctrl tasta, apoi eliberați mouse-ul.

Și acum întâlnirea selectată este copiată exact într-o altă zi, cu excepția datei de începere și a celei de încheiere. Vedeți captura de ecran:


Copiați o întâlnire într-o altă zi în calendarul Outlook cu butonul din dreapta al mouse-ului

În Calendar vizualizarea Outlook, trageți programarea ținând apăsat butonul din dreapta al mouse-ului, eliberați mouse-ul până în ziua specificată în care veți copia, apoi selectați Copiați din meniul contextual popping out. Vedeți captura de ecran:

Și acum întâlnirea este copiată în ziua specificată în Calendar în Outlook. Vedeți captura de ecran:

Redirecționați automat fiecare e-mail către destinatarul specificat în Outlook

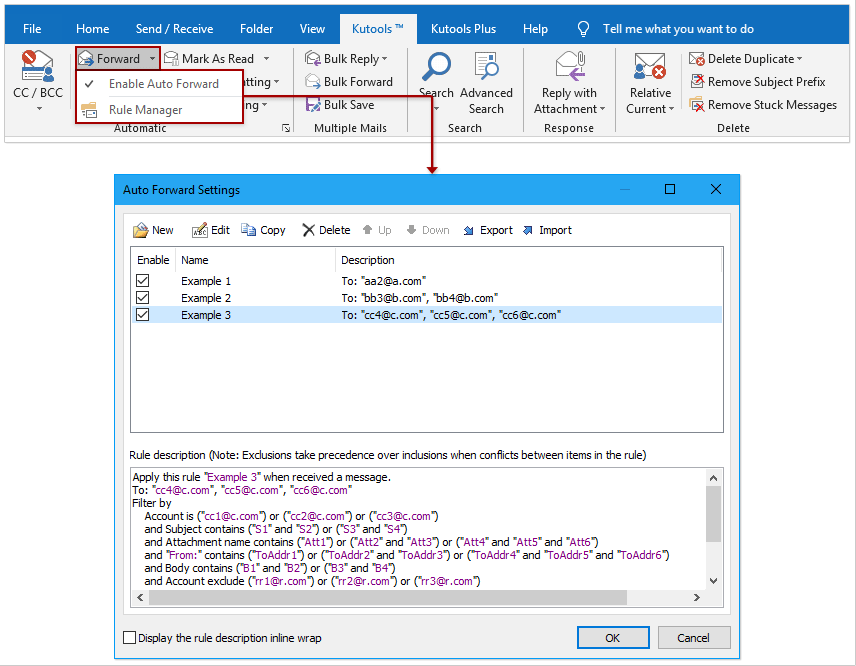
În general vorbind, putem seta o regulă pentru a redirecționa automat e-mailurile către destinatarii specificați, cum ar fi un alt cont de e-mail, Gmail sau colegii dvs. etc. Dar, știm că va dura mult timp pentru a configura o regulă personalizată în Outlook. Acum, introducem Kutools pentru Outlook (Automat) Înainte , care poate seta o regulă de redirecționare automată numai cu câteva clicuri.


redirecționare automată a e-mailurilor

Articole pe aceeaşi temă


Cele mai bune instrumente de productivitate de birou

Kutools pentru Outlook - Peste 100 de funcții puternice pentru a vă supraalimenta Outlook

🤖 AI Mail Assistant: E-mailuri profesionale instantanee cu magie AI--un singur clic pentru răspunsuri geniale, ton perfect, stăpânire în mai multe limbi. Transformați e-mailurile fără efort! ...

📧 Automatizare e-mail: În afara biroului (disponibil pentru POP și IMAP)  /  Programați trimiterea de e-mailuri  /  CC/BCC automat după reguli la trimiterea e-mailului  /  Redirecționare automată (Reguli avansate)   /  Adăugare automată felicitare   /  Împărțiți automat e-mailurile cu mai mulți destinatari în mesaje individuale ...

📨 Managementul e-mail: Amintește-ți cu ușurință e-mailurile  /  Blocați e-mailurile înșelătorii de către subiecți și alții  /  Ștergeți e-mailurile duplicate  /  Cautare Avansata  /  Consolidați foldere ...

📁 Atașamente ProSalvați în serie  /  Detașare lot  /  Compresă în loturi  /  Salvare automata   /  Detașare automată  /  Comprimare automată ...

🌟 Magia interfeței: 😊Mai multe emoji drăguțe și cool   /  Îmbunătățiți-vă productivitatea Outlook cu vizualizările cu file  /  Minimizați Outlook în loc să închideți ...

???? Minuni cu un singur clic: Răspundeți tuturor cu atașamentele primite  /   E-mailuri anti-phishing  /  🕘Afișați fusul orar al expeditorului ...

👩🏼‍🤝‍👩🏻 Contacte și calendar: Adăugați în lot contacte din e-mailurile selectate  /  Împărțiți un grup de contact în grupuri individuale  /  Eliminați mementouri de ziua de naștere ...

Peste 100 Caracteristici Așteaptă explorarea ta! Click aici pentru a descoperi mai multe.


Comments (12)
Rated 5 out of 5 · 1 ratings
This comment was minimized by the moderator on the site
Muito obrigado! Funciona e é simples e rápido de fazer. A explicação com as imagens ajudou muito.
Rated 5 out of 5
This comment was minimized by the moderator on the site
I was able to follow Bethanne's comments and was successful after cursing MS on this for months. THANKS! "Find your folders pane. Mine is on the left of the screen and shows just two months over the list of folders. One can resize the folders pane to reveal more months. There's a border between the folders pane and the main calendar view. Hover over that border and your cursor arrow changes to the column resize icon. Now drag the border over to make the folders pane bigger and the main view smaller. More months will appear in the folders pane." Then, follow the suggestion to hold CTRL to copy while dragging the appointment you want to duplicate to the new callendar location, and DROP it.
This comment was minimized by the moderator on the site
On the left side of your screen should be a folder pane. Open and pin it to stay open, if it is not already. Click on the date of the appointment/meeting you want to copy. Then find the date in the control pane you want to copy the appointment/meeting to. Hold the ctrl button while clicking on the date(s) you want to copy to. All chosen date should appear on your screen. Then you can use the drag and drop with right click on the mouse, or hold ctrl while drag & dropping to the next date(s).
This comment was minimized by the moderator on the site
On my machine, any of the copy-paste methods (inc. ctrl+c, ctrl+v) do not copy the reminder - the one thing that definitely should be copied!
This comment was minimized by the moderator on the site
Thank you, thank you, thank you for posting this!
This comment was minimized by the moderator on the site
On a Macintosh computer, you hold down the Option key, then click and drag the item to a different day.
This comment was minimized by the moderator on the site
Copying the appointment by dragging doesn't work if the target date is not visible on the screen. The calendar does not scroll while you are dragging the appointment.
This comment was minimized by the moderator on the site
Hi,
Here is a workaround may help you.
Drag to copy the appointment to any one date close to the target appointment, and then modify the start date and end date of the new appointment.
Hope it helpful!
This comment was minimized by the moderator on the site
Agree, this is what I am trying to do as well. Anyone found a solution?
This comment was minimized by the moderator on the site
Did you find an answer for this, Guy? I need to know the very same thing.
This comment was minimized by the moderator on the site
Sandra's got the right answer, but I'll be more specific: Find your folders pane. Mine on the left of the screen and shows just two months over the list of folders. One can resize the folders pane to reveal more months. There's a border between the folders pane and the main calendar view. Hover over that border and your cursor arrow changes to the column resize icon. Now drag the border over to make the folders pane bigger and the main view smaller. More months will appear in the folders pane. It drove me absolutely crazy until I figured this out.
This comment was minimized by the moderator on the site
where you can view multiple months on the side or wherever you position them, you can view more than a year's worth if you click and drag the dragger* (sorry i don't know the correct term) you can then right-click your calendar invite, drag & drop it onto any day you choose
There are no comments posted here yet
Please leave your comments in English
Posting as Guest
×
Rate this post:
0   Characters
Suggested Locations