Salt la conținutul principal

Cum se creează mementouri Outlook din foaia de calcul Excel?

Acest articol vorbește despre crearea de memento-uri Outlook pe baza datelor din foaia de calcul Excel.

Memento-uri Crete Outlook din foaia de calcul Excel cu cod VBA


Creați mementouri Outlook din foaia de calcul Excel cu cod VBA

Dacă doriți să creați mementouri Outlook din Excel, procedați după cum urmează.

1. Creați o foaie de lucru conține antetele coloanei și câmpurile de memento corespunzătoare, așa cum este prezentat mai jos.

notițe: Pentru starea de ocupat coloană, număr 2 înseamnă că mementoul va fi afișat ca Ocupat în calendarul dvs. Outlook. Îl puteți schimba în 1 (Tentativ), 3 (În afara biroului), 4 (Lucrează în altă parte), Sau 5 (gratuit) după cum ai nevoie.

2. apasă pe Alt + F11 tastele pentru a deschide Microsoft Visual Basic pentru aplicații fereastră.

3. În Microsoft Visual Basic pentru aplicații fereastră, faceți clic pe Insera > Module. Apoi copiați mai jos codul VBA în fereastra Cod.

Cod VBA: creați mementouri Outlook din foaia de calcul Excel

Sub AddAppointments()
'Update by Extendoffice 20180608
    Dim I As Long
    Dim xRg As Range
    Dim xOutApp As Object
    Dim xOutItem As Object
    Set xOutApp = CreateObject("Outlook.Application")
    Set xRg = Range("A2:G2")
    For I = 1 To xRg.Rows.Count
        Set xOutItem = xOutApp.createitem(1)
        Debug.Print xRg.Cells(I, 1).Value
        xOutItem.Subject = xRg.Cells(I, 1).Value
        xOutItem.Location = xRg.Cells(I, 2).Value
        xOutItem.Start = xRg.Cells(I, 3).Value
        xOutItem.Duration = xRg.Cells(I, 4).Value
        If Trim(xRg.Cells(I, 5).Value) = "" Then
            xOutItem.BusyStatus = 2
        Else
            xOutItem.BusyStatus = xRg.Cells(I, 5).Value
        End If
        If xRg.Cells(I, 6).Value > 0 Then
            xOutItem.ReminderSet = True
            xOutItem.ReminderMinutesBeforeStart = xRg.Cells(I, 6).Value
        Else
            xOutItem.ReminderSet = False
        End If
        xOutItem.Body = xRg.Cells(I, 7).Value
        xOutItem.Save
        Set xOutItem = Nothing
    Next
    Set xOutApp = Nothing
End Sub

notițe: În codul de mai sus, A2: G2 este intervalul de date pe care doriți să creați întâlniri pe baza.

4. apasă pe F5 sau faceți clic pe butonul Executare pentru a rula codul. Apoi, toate programările cu câmpuri specifice vor fi inserate simultan în calendarul Outlook.

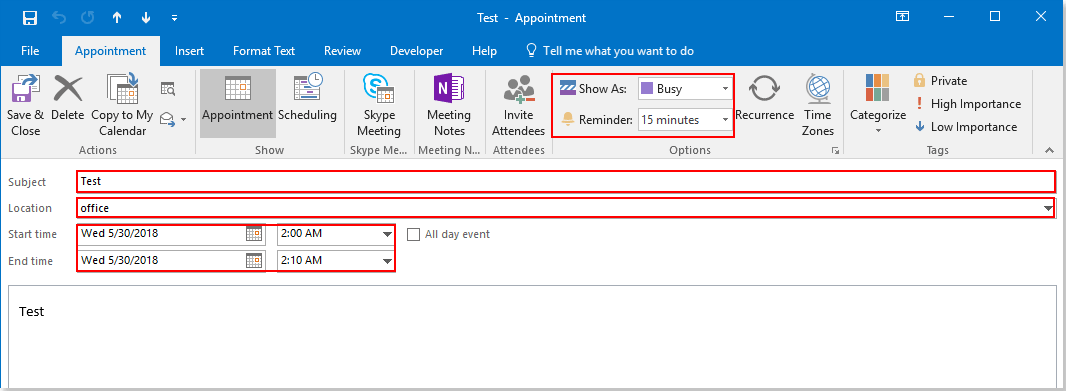
Apoi, puteți merge la Calendarul perspectivelor dvs. pentru a vedea rezultatele, a se vedea captura de ecran: 


Cele mai bune instrumente de productivitate de birou

Kutools pentru Outlook - Peste 100 de funcții puternice pentru a vă supraalimenta Outlook

🤖 AI Mail Assistant: E-mailuri profesionale instantanee cu magie AI--un singur clic pentru răspunsuri geniale, ton perfect, stăpânire în mai multe limbi. Transformați e-mailurile fără efort! ...

📧 Automatizare e-mail: În afara biroului (disponibil pentru POP și IMAP)  /  Programați trimiterea de e-mailuri  /  CC/BCC automat după reguli la trimiterea e-mailului  /  Redirecționare automată (Reguli avansate)   /  Adăugare automată felicitare   /  Împărțiți automat e-mailurile cu mai mulți destinatari în mesaje individuale ...

📨 Managementul e-mail: Amintește-ți cu ușurință e-mailurile  /  Blocați e-mailurile înșelătorii de către subiecți și alții  /  Ștergeți e-mailurile duplicate  /  Cautare Avansata  /  Consolidați foldere ...

📁 Atașamente ProSalvați în serie  /  Detașare lot  /  Compresă în loturi  /  Salvare automata   /  Detașare automată  /  Comprimare automată ...

🌟 Magia interfeței: 😊Mai multe emoji drăguțe și cool   /  Îmbunătățiți-vă productivitatea Outlook cu vizualizările cu file  /  Minimizați Outlook în loc să închideți ...

???? Minuni cu un singur clic: Răspundeți tuturor cu atașamentele primite  /   E-mailuri anti-phishing  /  🕘Afișați fusul orar al expeditorului ...

👩🏼‍🤝‍👩🏻 Contacte și calendar: Adăugați în lot contacte din e-mailurile selectate  /  Împărțiți un grup de contact în grupuri individuale  /  Eliminați mementouri de ziua de naștere ...

Peste 100 Caracteristici Așteaptă explorarea ta! Click aici pentru a descoperi mai multe.


Comments (66)
Rated 5 out of 5 · 2 ratings
This comment was minimized by the moderator on the site
How can I make this module run automatically when I close Excel? That way I can input data, and only have to close the file without having to manually run the code?
This comment was minimized by the moderator on the site
Hi JAIME GARCIA,
To make the AddAppointments subroutine run automatically when you close the Excel workbook, you can apply the following VBA code. This event is triggered right before the workbook is closed. Here's how you can adjust the code to run when the workbook is closed:
1. Open the Excel workbook where you want this functionality.
2. Press Alt + F11 to open the VBA editor.
3. In the Project Explorer on the left side, find ThisWorkbook under the VBAProject for your workbook.
4. Double-click ThisWorkbook to open its code module.
5. In the code window for ThisWorkbook, insert the following code.
6. Now you need to save this workbook as Excel Macro-Enabled Workbook (click File > Save As > choose Excel Macro-Enabled Workbook from Save as Type drop-down list > click Save).

Note: In this code, be sure to replace "SheetName" with the actual name of the worksheet containing your appointment data.

Private Sub Workbook_BeforeClose(Cancel As Boolean)
    AddAppointments
End Sub

Sub AddAppointments()
    ' Updated by Extendoffice 20180608
    Dim I As Long
    Dim xRg As Range
    Dim xOutApp As Object
    Dim xOutItem As Object
    Set xOutApp = CreateObject("Outlook.Application")
    Set xRg = ThisWorkbook.Sheets("SheetName").Range("A2:G2") ' Replace "SheetName" with the actual name of your sheet
    
    For I = 1 To xRg.Rows.Count
        Set xOutItem = xOutApp.createitem(1)
        xOutItem.Subject = xRg.Cells(I, 1).Value
        xOutItem.Location = xRg.Cells(I, 2).Value
        xOutItem.Start = xRg.Cells(I, 3).Value
        xOutItem.Duration = xRg.Cells(I, 4).Value
        xOutItem.BusyStatus = IIf(Trim(xRg.Cells(I, 5).Value) = "", 2, xRg.Cells(I, 5).Value)
        xOutItem.ReminderSet = xRg.Cells(I, 6).Value > 0
        xOutItem.ReminderMinutesBeforeStart = IIf(xOutItem.ReminderSet, xRg.Cells(I, 6).Value, 0)
        xOutItem.Body = xRg.Cells(I, 7).Value
        xOutItem.Save
        Set xOutItem = Nothing
    Next I
    Set xOutApp = Nothing
End Sub
This comment was minimized by the moderator on the site
Hello:

Thank you all for this amazing forum. I hope you will forgive me if this has already been asked, but is there a way to tweak the code to create an Outlook TASK instead of an appointment?

Please advise.

David
Rated 5 out of 5
This comment was minimized by the moderator on the site
How can I revise the code to include multiple rows?
This comment was minimized by the moderator on the site
HI Miller,

In this line Set xRg = Range("A2:G2") of the code, simply change the range "A2:G2" to a range containing multiple rows, such as "A2:G10"
This comment was minimized by the moderator on the site
This is a great tool. Was wondering if there is a way to add the appointments to a shared calendar, instead of my personal outlook calendar.
This comment was minimized by the moderator on the site
HI Crystal,
the code worked find, but I made some changes in Table & run the code again, now I have 2 reminders for same event, how to remove 1st reminder from my outlook calendar.
This comment was minimized by the moderator on the site
Hi Sushant Gawali,

The code only helps you to create reminders from Excel. If a duplicate reminder is created, you will need to go to the Outlook calendar to delete it manually. Sorry for the inconvenience.
This comment was minimized by the moderator on the site
If we share the excel with other user and they run this micro-enabled filed, will they have all the invites saved?
This comment was minimized by the moderator on the site
Hi,
If you save this Excel file as an Excel Macro-Enabled Workbook and send it to someone else, the invitation will be saved in their Outlook calendar after running the VBA code.
This comment was minimized by the moderator on the site
Excellent, thanks!
Rated 5 out of 5
This comment was minimized by the moderator on the site
Hi Crystal,

Thank you for letting me know.
This comment was minimized by the moderator on the site
Thank you for posting your code, it works perfectly for me for adding to Outlook. Is there a way to add it to a Google Calendar instead?

Thanks.
This comment was minimized by the moderator on the site
Hi David Ramsay,
I can’t fix this problem. Sorry about that.
This comment was minimized by the moderator on the site
Hello,

For some reason it won’t pull all dates.
My range is A2:C14 and it seems to cherry pick dates. Any tips?
This comment was minimized by the moderator on the site
Hi Hailey,
You may need to attach a screenshot or a sample file to describe the problem you encountered more clearly.
There are no comments posted here yet
Load More
Please leave your comments in English
Posting as Guest
×
Rate this post:
0   Characters
Suggested Locations