Salt la conținutul principal

Cum se exportă toate imaginile simultan din Excel?

Presupunând că aveți o mulțime de imagini în registrul de lucru și doriți să le salvați într-un anumit folder la un moment dat, de obicei, puteți copia și lipi imaginile una câte una manual pentru salvare, dar este nevoie de timp pentru a le copia și lipi. în mod repetat așa. Aici, vă voi prezenta câteva sfaturi pentru a rezolva această treabă.


Exportați toate imaginile simultan din Excel cu funcția Salvare ca

Cu Excel încorporat Salvare ca funcția, puteți salva un registru de lucru ca Pagină web pentru a salva toate imaginile, inclusiv diagrame, forme și alte obiecte într-un dosar. Vă rugăm să faceți după cum urmează.

1. Deschideți registrul de lucru cu imaginile pe care doriți să le salvați. Clic Fișier > Salvare ca > Naviga.

2. În Salvare ca casetă de dialog, trebuie să:

2.1) Alegeți un folder pentru a salva imaginile exportate;
2.2) Alegeți Pagină web din lista derulantă Salvare ca tip;
2.3) Faceți clic pe Economisiți butonul.

3. În fereastra pop-up Microsoft Excel , faceți clic pe Da butonul.

4. Deschideți folderul în care sunt salvate fișierele exportate și puteți vedea un folder și un fișier în format HTML listate în interior. Toate imaginile din registrul de lucru, inclusiv diagrame, forme sau obiecte, sunt salvate în acest folder.

5. Puteți păstra imaginile de care aveți nevoie în dosar și puteți șterge altele de care nu aveți nevoie


Exportați cu ușurință toate imaginile dintr-o dată din Excel Cu un instrument uimitor

Metoda de mai sus va extrage toate obiectele din registrul de lucru, poate, unele dintre ele nu aveți nevoie. Daca ai Kutools pentru Excel instalat în Excel, este Exportați grafică caracteristica vă poate ajuta să salvați doar imaginile de care aveți nevoie.

După instalare Kutools pentru Excel, vă rugăm să faceți următoarele:

1. clic Kutools Plus > Import Export > Exportați grafică:

2. În Exportați grafică casetă de dialog, vă rugăm să configurați după cum urmează:

2.1) Alegeți poze de la Tipuri de lista verticală;
Sfat: În mod implicit, toate elementele grafice, inclusiv diagramele, imaginile și formele din registrul de lucru curent sunt listate.
2.2) În Salvați directorul secțiune, faceți clic pe butonul pentru a selecta un folder pentru a salva imaginile exportate;
2.3) În Exportați formatul listă derulantă, alegeți tipul de imagine pe care doriți să o exportați;
2.4) Faceți clic pe OK.

3. Apoi apare o casetă de dialog pentru a vă spune câte imagini au fost exportate cu succes, faceți clic pe OK butonul.

Acum puteți merge în folderul de destinație și puteți verifica imaginile exportate.

Vă rugăm să faceţi clic pe Exportați grafică pentru a afla mai multe despre această caracteristică.

Înainte de a aplica Kutools pentru Excel, Vă rugăm să descărcați-l și instalați-l mai întâi.


Exportați imagini și redenumiți-le cu valorile celulelor adiacente

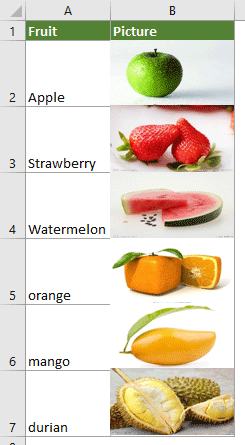
După cum se arată în captura de ecran de mai jos, există două coloane, una conține o listă de nume de fructe, iar cealaltă conține imaginile corespunzătoare ale fructelor. Pentru a exporta aceste imagini și a le denumi automat cu numele fructelor corespunzătoare, puteți încerca codul VBA din această secțiune.

1. În foaia de lucru în care doriți să exportați imaginile, apăsați tasta Alt + F11 tastele pentru a deschide Microsoft Visual Basic pentru aplicații fereastră.

2. În Microsoft Visual Basic pentru aplicații fereastră, faceți clic pe Insera > Modul. Și apoi copiați următorul VBA în fereastra Modulului.

Cod VBA: Exportați imagini într-o coloană și denumiți-le automat

Sub ExportImages_ExtendOffice()
'Updated by Extendoffice 20220308
    Dim xStrPath As String
    Dim xStrImgName As String
    Dim xImg As Shape
    Dim xObjChar As ChartObject
    Dim xFD As FileDialog
    Set xFD = Application.FileDialog(msoFileDialogFolderPicker)
    xFD.Title = "Please select a folder to save the pictures" & " - ExtendOffice"
    If xFD.Show = -1 Then
       xStrPath = xFD.SelectedItems.Item(1) & "\"
    Else
        Exit Sub
    End If
    
    On Error Resume Next
    For Each xImg In ActiveSheet.Shapes
        If xImg.TopLeftCell.Column = 2 Then
        xStrImgName = xImg.TopLeftCell.Offset(0, -1).Value
        If xStrImgName <> "" Then
            xImg.Select
            
            Selection.Copy
            Set xObjChar = ActiveSheet.ChartObjects.Add(0, 0, xImg.Width, xImg.Height)
            With xObjChar
                .Border.LineStyle = xlLineStyleNone
                .Activate
                ActiveChart.Paste
                .Chart.Export xStrPath & xStrImgName & ".png"
                .Delete
            End With
        End If
        End If
    Next
End Sub

note:

1) Numărul 2 in linie "Dacă xImg.TopLeftCell.Column = 2, atunci” reprezintă numărul coloanei din care doriți să exportați imaginile;
2) Numărul -1 in linie "xStrImgName = xImg.TopLeftCell.Offset(0, -1).Value” indică faptul că veți denumi imaginile cu valorile celulelor din stânga adiacente.

3. apasă pe F5 tasta pentru a rula codul. În fereastra de deschidere, selectați un folder pentru a salva imaginile și apoi faceți clic OK.

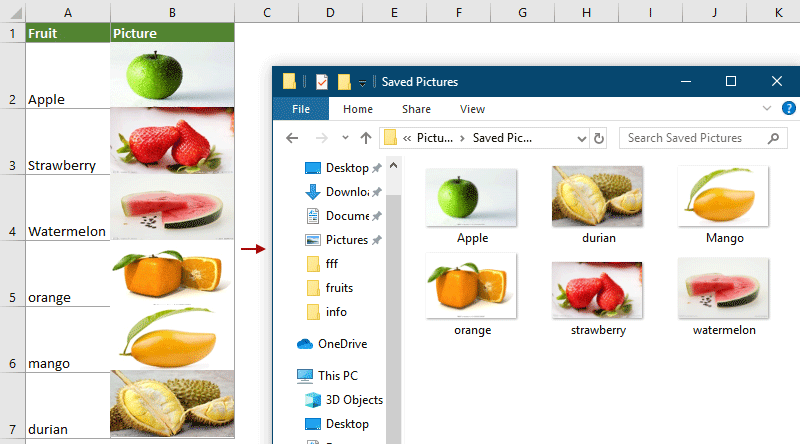
Apoi, toate imaginile dintr-o coloană specificată sunt exportate și denumite automat cu valorile celulelor adiacente, așa cum ați specificat.


Articol asociat:

Cum se exportă diagrame în grafice în Excel?

Cele mai bune instrumente de productivitate de birou

🤖 Kutools AI Aide: Revoluționați analiza datelor pe baza: Execuție inteligentă   |  Generați codul  |  Creați formule personalizate  |  Analizați datele și generați diagrame  |  Invocați funcțiile Kutools...
Caracteristici populare: Găsiți, evidențiați sau identificați duplicatele   |  Ștergeți rândurile goale   |  Combinați coloane sau celule fără a pierde date   |   Rundă fără Formula ...
Super căutare: VLookup cu mai multe criterii    VLookup cu valori multiple  |   VLookup pe mai multe foi   |   Căutare fuzzy ....
Listă derulantă avansată: Creați rapid o listă derulantă   |  Listă drop-down dependentă   |  Listă derulantă cu selectare multiplă ....
Manager de coloane: Adăugați un număr specific de coloane  |  Mutați coloanele  |  Comutați starea vizibilității coloanelor ascunse  |  Comparați intervale și coloane ...
Caracteristici prezentate: Focus pe grilă   |  Vedere de proiectare   |   Big Formula Bar    Manager registru de lucru și foi   |  Biblioteca de resurse (Text automat)   |  Data Picker   |  Combinați foi de lucru   |  Criptare/Decriptare celule    Trimiteți e-mailuri după listă   |  Super Filtru   |   Filtru special (filtrează bold/italic/barat...) ...
Top 15 seturi de instrumente12 Text Instrumente (Adăuga text, Eliminați caractere,...)   |   50+ Diagramă Tipuri de (Gantt Chart,...)   |   40+ Practic Formule (Calculați vârsta pe baza zilei de naștere,...)   |   19 inserare Instrumente (Introduceți codul QR, Inserați imaginea din cale,...)   |   12 Convertire Instrumente (Numere la cuvinte, conversie valutara,...)   |   7 Merge & Split Instrumente (Rânduri combinate avansate, Celule divizate,...)   |   ... și altele

Îmbunătățiți-vă abilitățile Excel cu Kutools pentru Excel și experimentați eficiența ca niciodată. Kutools pentru Excel oferă peste 300 de funcții avansate pentru a crește productivitatea și a economisi timp.  Faceți clic aici pentru a obține funcția de care aveți cea mai mare nevoie...

Descriere


Fila Office aduce interfața cu file în Office și vă face munca mult mai ușoară

  • Activați editarea și citirea cu file în Word, Excel, PowerPoint, Publisher, Access, Visio și Project.
  • Deschideți și creați mai multe documente în filele noi ale aceleiași ferestre, mai degrabă decât în ​​ferestrele noi.
  • Vă crește productivitatea cu 50% și reduce sute de clicuri de mouse pentru dvs. în fiecare zi!
Comments (24)
Rated 5 out of 5 · 1 ratings
This comment was minimized by the moderator on the site
WaW Amazing ! Thanks a lot ! It works perfect for me !
I couldn't insert Milan's code inside the first one, so maybe you could update with the two codes combined ?
It is because my pictures are so small...
Rated 5 out of 5
This comment was minimized by the moderator on the site
Thank you! The code does the job. The only downside is it exports images in displayed size, not in original size. And it's often the case, when an otherwise large image is scaled down to fit in the cell. Is there a way to tweak this code to export original size images?

Sub ExportImages_ExtendOffice()
'Updated by Extendoffice 20220308
    Dim xStrPath As String
    Dim xStrImgName As String
    Dim xImg As Shape
    Dim xObjChar As ChartObject
    Dim xFD As FileDialog
    Set xFD = Application.FileDialog(msoFileDialogFolderPicker)
    xFD.Title = "Please select a folder to save the pictures" & " - ExtendOffice"
    If xFD.Show = -1 Then
       xStrPath = xFD.SelectedItems.Item(1) & "\"
    Else
        Exit Sub
    End If
    
    On Error Resume Next
    For Each xImg In ActiveSheet.Shapes
        If xImg.TopLeftCell.Column = 2 Then
        xStrImgName = xImg.TopLeftCell.Offset(0, -1).Value
        If xStrImgName <> "" Then
            xImg.Select
            
            Selection.Copy
            Set xObjChar = ActiveSheet.ChartObjects.Add(0, 0, xImg.Width, xImg.Height)
            With xObjChar
                .Border.LineStyle = xlLineStyleNone
                .Activate
                ActiveChart.Paste
                .Chart.Export xStrPath & xStrImgName & ".png"
                .Delete
            End With
        End If
        End If
    Next
End Sub
This comment was minimized by the moderator on the site
same issue...
just a quick edit:
If xStrImgName <> "" Then
            xImg.Select
          [b]  xImg.ScaleHeight 1#, True, msoScaleFromTopLeft
            xImg.ScaleWidth 1#, True, msoScaleFromTopLeft[/b]


this will resize all images, so you have to close the file afterwards without saving to preserve the initial vie, but the pictures will go out in their original size.
This comment was minimized by the moderator on the site
fixed, thank you anyway:

Sub ExportImages_ExtendOffice()
'Updated by Extendoffice 20220308
    Dim xStrPath As String
    Dim xStrImgName As String
    Dim xImg As Shape
    Dim xObjChar As ChartObject
    Dim xFD As FileDialog
    Set xFD = Application.FileDialog(msoFileDialogFolderPicker)
    xFD.Title = "Please select a folder to save the pictures" & " - ExtendOffice"
    If xFD.Show = -1 Then
       xStrPath = xFD.SelectedItems.Item(1) & "\"
    Else
        Exit Sub
    End If
    
    On Error Resume Next
    For Each xImg In ActiveSheet.Shapes
        If xImg.TopLeftCell.Column = 2 Then
        xStrImgName = xImg.TopLeftCell.Offset(0, -1).Value
        If xStrImgName <> "" Then
            xImg.Select
'            Selection.Copy
            Selection.CopyPicture Appearance:=xlScreen, Format:=xlPicture
            Set xObjChar = ActiveSheet.ChartObjects.Add(0, 0, xImg.Width, xImg.Height)
            With xObjChar
                .Parent.ShapeRange.Line.Visible = msoFalse
                .Border.LineStyle = xlLineStyleNone
'                .Activate
                .Select
                ActiveChart.Paste
                .Chart.Export xStrPath & xStrImgName & ".png"
                .Delete
            End With
        End If
        End If
    Next
End Sub
This comment was minimized by the moderator on the site
Thank you for this great tool, It saved me a ton of time. But I've ran into an issue that most of the photos are saved as blank photos as shown in the attached screenshot. Appreciate the help. Thank you
This comment was minimized by the moderator on the site
Hello, Mohamed
Did your problem occur when using Kutools for Excel? If so, could you upload your workbook file here if you don't mind?
So that, we can check where the problem is?
Thank you!
This comment was minimized by the moderator on the site
I am using the code given in the " Export images and rename them with the adjacent cell values" part of the article. When I run this code I get the following error: "Run-time error '91': Object variable or With block variable not set."

When I click "debug" it points me to line 9 of the code :
xFD.Title = "Please select a folder to save the pictures" & " - ExtendOffice"

Do you have a solution to this? Your article is the only solution I can find.

I am using Excel for Mac.
This comment was minimized by the moderator on the site
Hello, Dylan,

Sorry, our code is only applicable to Microsoft Excel, maybe you can try the code in Microsoft Excel.
Thank you!
This comment was minimized by the moderator on the site
I am using Microsoft Excel on Mac OSX.
This comment was minimized by the moderator on the site
I am also getting this issue using a Mac - Dylan were you able to resolve?

Are we meant to change something with the below that it is picking up as a bug?

xFD.Title = "Please select a folder to save the pictures" & " - ExtendOffice"
This comment was minimized by the moderator on the site
Hello, thank you for this article. When I execute the code above from Export images and rename them with the adjacent cell values, I get the following error message: Run-time error '91': Object variable or With block variable not set. When I click debug, it highlights line 9 of the code. Do you know why this is happening? FYI I am using Excel for Mac OSX. Thank you
This comment was minimized by the moderator on the site
Τέλειο εργαλείο! Όμως το μέγεθος-ανάλυση της εικόνας μικραίνει . Υπάρχει τρόπος να διατηρηθεί η αρχική ανάλυση ?
This comment was minimized by the moderator on the site
Bonjour le code VBA m'enregistre des images blanches je ne comprends pas pourquoi. quelqu'un a une solution ?
This comment was minimized by the moderator on the site
Hello, Sophie,
The code in this article can work well in my Excel, could you upload your Excel file here if you don't mind? So we can help to check the problem for you.
Or you can describe your problem more clear and detailed.
Thank you!
This comment was minimized by the moderator on the site
hallo skyyang, ich habe seit neulich das gleiche problem, viele leere *.png dateien.
Your text to link
bei jedem exportversuch werden andere bilder nicht richtig erfasst.
mfg und danke
This comment was minimized by the moderator on the site
Hello, milan bojic
Which Excel version do you use?
I have tried the code in your workbook, it works well, and all the images in your workbook are exported in the folder and renamed based on the cell value, see screenshot:
https://www.extendoffice.com/images/stories/comments/comment-skyyang/doc-export-images-1.png
This comment was minimized by the moderator on the site
Hello skyyang, it's office 365. your code was working fine until 2 weeks ago, not anymore, see screenshot. meanwhile i found something similar that works, (combined with yours), maybe you can use that for your code.

screenshot:
[img]https://drive.google.com/file/d/1vfRlhpyzqg7QNFeYl53mTvNON3gIrFwv/view?usp=sharing[/img]


Sub BilderExportieren()
    Dim shaBild As Shape
    Dim strZielpfad As String
    strZielpfad = "c:\Tuerliste\img3\" '<== Zielpfad entsprechend anpassen!!
    For Each shaBild In ActiveSheet.Shapes
        BildExportShape shaBild, strZielpfad
    Next shaBild
End Sub

Sub BildExportShape(shaBild As Shape, strZiel As String)
    Dim xStrImgName As String
    Dim chDiagramm As ChartObject
    xStrImgName = shaBild.TopLeftCell.Offset(0, -1).Value
    Application.ScreenUpdating = False
    shaBild.CopyPicture Appearance:=xlScreen, Format:=xlPicture
    Set chDiagramm = ActiveSheet.ChartObjects.Add(0, 0, shaBild.Width, shaBild.Height)
    With chDiagramm.Chart
        ' erforderlich bei Excel2010, da Diagrammfläche automatisch mit Rahmen erstellt wird
        .Parent.ShapeRange.Line.Visible = msoFalse
        ' bei Excel2016 muss die Diagrammfläche selektiert vor .Paste werden - andernfalls ist das Bild leer
        If Val(Application.Version) = 16 Then .ChartArea.Select
        .Paste
        .Export Filename:=strZiel & xStrImgName & ".png", FilterName:="png"
    End With
    chDiagramm.Delete
    Set chDiagramm = Nothing
    Set shaBild = Nothing
    Application.ScreenUpdating = True
End Sub


Thank you anyway
Milan Bojic
This comment was minimized by the moderator on the site
Hello, milan bojic,
Thanks for your code, maybe it can help others in the future. 🙂
This comment was minimized by the moderator on the site
This is great, if I wanted to grab the background colour of a cell (instead of an image) and save that as a image named with the adjacent cell how would that be an easy change to the code?
This comment was minimized by the moderator on the site
Hi Tom,Do you mean saving the background color of the cell as an image and named it with the adjacent cell value?Sorry can't help you with that.
This comment was minimized by the moderator on the site
thanks a lot it helped me a lot
There are no comments posted here yet
Load More
Please leave your comments in English
Posting as Guest
×
Rate this post:
0   Characters
Suggested Locations