Salt la conținutul principal

Cum se introduce automat un rând nou gol prin butonul de comandă în Excel?

În multe cazuri, poate fi necesar să introduceți un rând nou gol într-o poziție specificată a foii de lucru. În acest articol, vă vom arăta cum să inserați automat un rând nou gol făcând clic pe un buton de comandă în Excel.

Introduceți automat un rând nou gol prin butonul de comandă


Introduceți automat un rând nou gol prin butonul de comandă

Puteți rula următorul cod VBA pentru a insera un rând nou gol făcând clic pe un buton de comandă. Vă rugăm să faceți următoarele.

1. În primul rând, trebuie să inserați un buton de comandă. Vă rugăm să faceți clic pe Dezvoltator > Insera > Buton de comandă (control ActiveX). Vedeți captura de ecran:

2. Apoi trageți un buton de comandă în foaia de lucru pe care trebuie să adăugați rânduri noi, faceți clic dreapta pe butonul de comandă și faceți clic pe Proprietăţi din meniul cu clic dreapta.

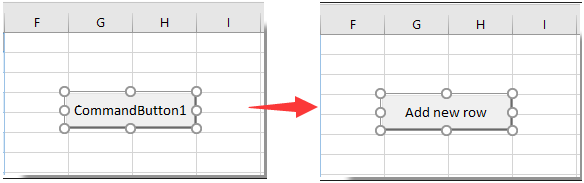
3. În Proprietăţi caseta de dialog, introduceți textul afișat al butonului de comandă în Legendă caseta de sub clasificate , apoi închideți caseta de dialog.

Puteți vedea textul afișat al butonului de comandă este modificat așa cum este prezentat mai jos.

4. Faceți clic din nou pe butonul de comandă, apoi faceți clic pe Afișați codul din meniul cu clic dreapta.

5. Apoi Microsoft Visual Basic pentru aplicații fereastra, înlocuiți codul original cu codul VBA de mai jos în Cod fereastră.

Cod VBA: introduceți automat un rând nou necompletat prin butonul de comandă

Private Sub CommandButton1_Click()
    Dim rowNum As Integer
    On Error Resume Next
    rowNum = Application.InputBox(Prompt:="Enter Row Number where you want to add a row:", _
                                    Title:="Kutools for excel", Type:=1)
    Rows(rowNum & ":" & rowNum).Insert Shift:=xlDown
End Sub

notițe: În cod, CommanButton1 este numele butonului de comandă pe care l-ați creat.

6. presa Alt + Q tastele simultan pentru a închide Microsoft Visual Basic pentru aplicații fereastră. Și opriți Mod de proiectare în temeiul Dezvoltator tab.

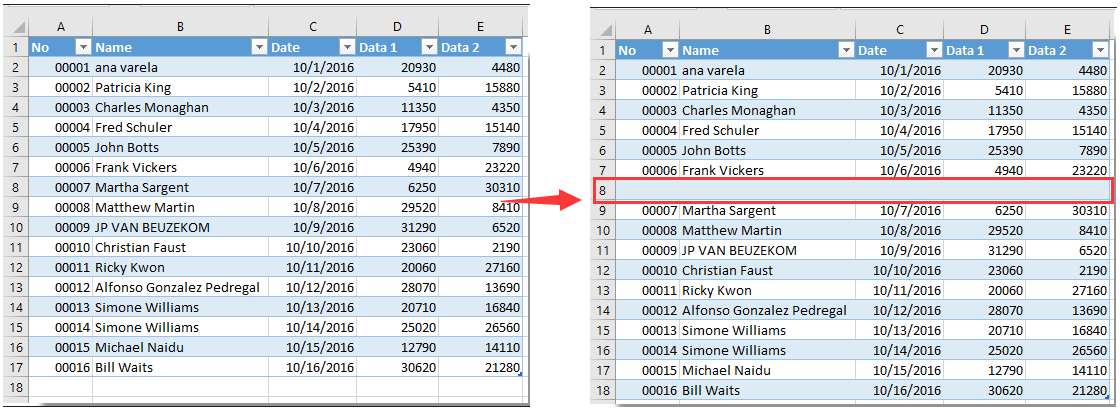
7. Faceți clic pe butonul de comandă inserat și pe a Kutools pentru Excel apare fereastra de dialog. Vă rugăm să introduceți un anumit număr de rând unde doriți să adăugați un rând nou necompletat, apoi faceți clic pe OK buton. Vedeți captura de ecran:

Apoi, noul rând gol este inserat într-o poziție specificată a foii de lucru, așa cum este prezentat mai jos. Și păstrează formatarea celulei celulei de mai sus.


Articole pe aceeași temă:

Cele mai bune instrumente de productivitate de birou

🤖 Kutools AI Aide: Revoluționați analiza datelor pe baza: Execuție inteligentă   |  Generați codul  |  Creați formule personalizate  |  Analizați datele și generați diagrame  |  Invocați funcțiile Kutools...
Caracteristici populare: Găsiți, evidențiați sau identificați duplicatele   |  Ștergeți rândurile goale   |  Combinați coloane sau celule fără a pierde date   |   Rundă fără Formula ...
Super căutare: VLookup cu mai multe criterii    VLookup cu valori multiple  |   VLookup pe mai multe foi   |   Căutare fuzzy ....
Listă derulantă avansată: Creați rapid o listă derulantă   |  Listă drop-down dependentă   |  Listă derulantă cu selectare multiplă ....
Manager de coloane: Adăugați un număr specific de coloane  |  Mutați coloanele  |  Comutați starea vizibilității coloanelor ascunse  |  Comparați intervale și coloane ...
Caracteristici prezentate: Focus pe grilă   |  Vedere de proiectare   |   Big Formula Bar    Manager registru de lucru și foi   |  Biblioteca de resurse (Text automat)   |  Data Picker   |  Combinați foi de lucru   |  Criptare/Decriptare celule    Trimiteți e-mailuri după listă   |  Super Filtru   |   Filtru special (filtrează bold/italic/barat...) ...
Top 15 seturi de instrumente12 Text Instrumente (Adăuga text, Eliminați caractere,...)   |   50+ Diagramă Tipuri de (Gantt Chart,...)   |   40+ Practic Formule (Calculați vârsta pe baza zilei de naștere,...)   |   19 inserare Instrumente (Introduceți codul QR, Inserați imaginea din cale,...)   |   12 Convertire Instrumente (Numere la cuvinte, conversie valutara,...)   |   7 Merge & Split Instrumente (Rânduri combinate avansate, Celule divizate,...)   |   ... și altele

Îmbunătățiți-vă abilitățile Excel cu Kutools pentru Excel și experimentați eficiența ca niciodată. Kutools pentru Excel oferă peste 300 de funcții avansate pentru a crește productivitatea și a economisi timp.  Faceți clic aici pentru a obține funcția de care aveți cea mai mare nevoie...

Descriere


Fila Office aduce interfața cu file în Office și vă face munca mult mai ușoară

  • Activați editarea și citirea cu file în Word, Excel, PowerPoint, Publisher, Access, Visio și Project.
  • Deschideți și creați mai multe documente în filele noi ale aceleiași ferestre, mai degrabă decât în ​​ferestrele noi.
  • Vă crește productivitatea cu 50% și reduce sute de clicuri de mouse pentru dvs. în fiecare zi!
Comments (26)
No ratings yet. Be the first to rate!
This comment was minimized by the moderator on the site
Bedankt voor je uitleg. Ik heb de formule toegepast maar bekom dat ik maar 1 lijn kan toevoegen. Daarna laat de knop het niet meer toe en moet ik eerst mijn toegevoegde rij verwijderen. Is er een manier om dit aan te passen?
This comment was minimized by the moderator on the site
Is there a way to make to row inset always below the last entry?
This comment was minimized by the moderator on the site
How do I do the opposite of this and create a button that will delete a row?
This comment was minimized by the moderator on the site
Hi Big Ant,

Here's the modified code to delete a specified row when the Command Button is clicked:


Private Sub CommandButton1_Click()
'Updated by Extendoffice 20230817
    Dim rowNum As Integer
    On Error Resume Next
    rowNum = Application.InputBox(Prompt:="Enter Row Number which you want to delete:", _
                                    Title:="Kutools for excel", Type:=1)
    If rowNum <> 0 Then
        Rows(rowNum).Delete Shift:=xlUp
    End If
End Sub
This comment was minimized by the moderator on the site
Criei uma linha e nomeei como spotB,
Mudei a altura da linha para 0,01 para ocultá-la (apenas por estética).
Criei um botão:
Application.Goto Reference:="spotB"
Selection.EntireRow.Insert

Problema resolvido.

Obrigado pelos códigos a Mah e crystal, mas eu tinha 8 títulos para separar, cada um inserindo linhas quando necessário ao usuário, e não queria nenhuma pergunta sobre quantidade de linhas, os usuários não leem perguntas e clicam logo em OK, depois reclamam...
This comment was minimized by the moderator on the site
... Testei os códigos acima, mas, como se trata de pessoas que vão usar, não é viável os box que pedem a linha e a quantidade, não dá...
This comment was minimized by the moderator on the site
Caros colegas, após pesquisar (bastante) na net não consegui encontrar um atalho, comando, código, nada, nada, que eu possa usar para inserir em uma macro APENAS uma forma de inserir uma linha ABAIXO da célula ativa. Isto porquê se eu gravar o endereço da célula, ele não muda, fica sempre na mesma célula e as seguintes não vão ficar corretamente abaixo, e se eu usar um endereço de célula fixo, a linha tem que ser inserida acima, mas não formata da forma desejada, que seria o formato das linhas de cima.

Acho que o código existe, só não encontro, já tentei várias formas, selecionando um fixo, subindo uma linha e pedindo para inserir após, mas as seguintes não funcionam de acordo.

Alguém poderia me ajudar?
This comment was minimized by the moderator on the site
Hi

I used the code but wanted to add rows with formulas, therefore I added the last line to be able to add the rows with formulas.
However, in my excel file and in column "F" I have a text which can be entered manually and would be different in different cases. Therefore, I would like to add rows below the reference row with keeping the formulas and values in all cells except the cell from column "F" which I would like to be copied as blank!
Could you please help me with what should I add to the underneath code to be able to have the cells of column "F" blank whenever I add a row with this code?
thanks in advance!

Private Sub CommandButton1_Click()
Dim xIntRrow As Integer
Dim rowNum As Integer
On Error Resume Next
rowNum = Application.InputBox(Prompt:="Enter Row Number where you want to add a row:", _
Title:="Kutools for excel", Type:=1)
xIntRrow = Application.InputBox(Prompt:="Type in the number of rows you want to insert", _
Title:="Kutools for excel", Type:=1)
Rows(rowNum + 1 & ":" & rowNum + 1).EntireRow.Resize(xIntRrow).Insert Shift:=xlShiftDown
Rows(rowNum).Resize(xIntRrow + 1).FillDown

End Sub
This comment was minimized by the moderator on the site
Hi Mah,
The following VBA code may do you a favor. Please give it a try. Thank you.

Private Sub CommandButton1_Click()
'Updated by Extendoffice 20220707
    Dim rowNum As Integer
    Dim xRg1, xRg2 As Range
    
    On Error Resume Next
    
    rowNum = Application.InputBox(Prompt:="Enter Row Number where you want to add a row:", _
                                    Title:="Kutools for excel", Type:=1)
    
    Rows(rowNum & ":" & rowNum).Insert Shift:=xlDown
    Rows((rowNum - 1) & ":" & (rowNum - 1)).Copy
    Rows(rowNum & ":" & rowNum).Select
    Selection.PasteSpecial Paste:=xlPasteAll, Operation:=xlNone, SkipBlanks:= _
        False, Transpose:=False
    Range("F" & rowNum).Value = ""
End Sub
This comment was minimized by the moderator on the site
Sub AddNewRow()


Private Sub CommandButton1_Click()

ActiveSheet.Unprotect Password:="1234"


Dim mySheets

Dim i As Long


mySheets = Array("Sheet2")


For i = LBound(mySheets) To UBound(mySheets)

With Sheets(mySheets(i))

.Range("B10").EntireRow.Insert Shift:=xlDown

.Range("B10:H10").Borders.Weight = xlThin

End With

Next i


ActiveSheet.Protect Password:="1234"


End Sub

I don't know if this will work for you. It worked quite well for me. I even left unprotected cells that you can input data and the formulas are still active. Took me a whole day to figure it out. replace "1234" with whatever password you feel like, "Sheet2" with the Sheet you are working with and input the range you want.
The code first unprotects the worksheet, adds row and protects the worksheet.
This comment was minimized by the moderator on the site
is it possible to create in a different sheet? I really need that
This comment was minimized by the moderator on the site
can possible insert multiple sheet row at one time click by this .
This comment was minimized by the moderator on the site
Hi,
The below code can help you solve the problem. Please have a try.

Private Sub CommandButton1_Click()
Dim xIntRrow As Integer
Dim rowNum As Integer
On Error Resume Next
rowNum = Application.InputBox(Prompt:="Enter Row Number where you want to add a row:", _
Title:="Kutools for excel", Type:=1)
xIntRrow = Application.InputBox(Prompt:="Type in the number of rows you want to insert", _
Title:="Kutools for excel", Type:=1)
Rows(rowNum + 1 & ":" & rowNum + 1).EntireRow.Resize(xIntRrow).Insert Shift:=xlShiftDown

End Sub
There are no comments posted here yet
Load More
Please leave your comments in English
Posting as Guest
×
Rate this post:
0   Characters
Suggested Locations