Salt la conținutul principal

Cum se creează o listă derulantă cu mai multe casete de selectare în Excel?

Mulți utilizatori Excel tind să creeze o listă derulantă cu mai multe casete de selectare pentru a selecta mai multe articole din listă de fiecare dată. De fapt, nu puteți crea o listă cu mai multe casete de selectare cu validare date. În acest tutorial, vă vom arăta două metode pentru a crea o listă derulantă cu mai multe casete de selectare în Excel.

Utilizați Casetă listă pentru a crea o listă verticală cu mai multe casete de selectare
R: Creați o casetă listă cu date sursă
B: Denumiți celula în care veți localiza elementele selectate
C: Introduceți o formă pentru a ajuta la afișarea elementelor selectate
Creați cu ușurință o listă verticală cu casete de selectare cu un instrument uimitor
Mai multe tutoriale pentru lista derulantă ...


Utilizați Casetă listă pentru a crea o listă verticală cu mai multe casete de selectare

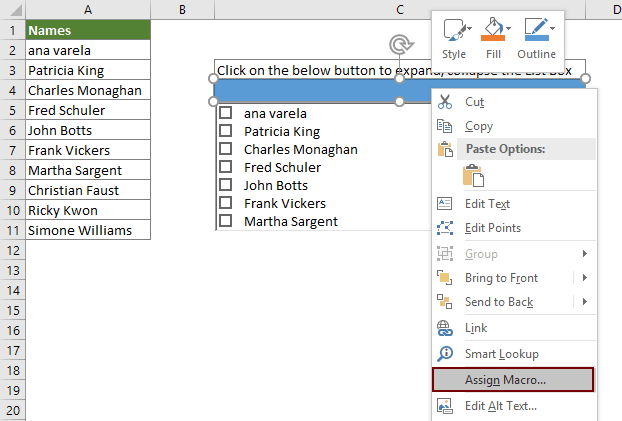
După cum se arată mai jos, în foaia de lucru curentă, toate numele din intervalul A2: A11 vor fi datele sursă ale listei. Faceți clic pe butonul din celula C4 pentru a afișa elementele selectate, iar toate elementele selectate în caseta de listă vor fi afișate în celula E4. Pentru a realiza acest lucru, vă rugăm să faceți următoarele.

A. Creați o casetă listă cu date sursă

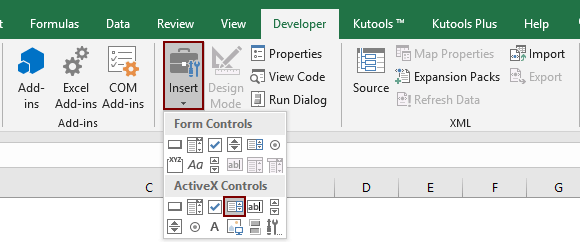
1. clic Dezvoltator > Insera > Casetă listă (Active X Control). Vedeți captura de ecran:

2. Desenați o casetă listă în foaia de lucru curentă, faceți clic dreapta pe ea și apoi selectați Proprietăţi din meniul cu clic dreapta.

3. În Proprietăţi casetă de dialog, trebuie să configurați după cum urmează.

  • 3.1 În ListFillRange , introduceți intervalul sursă pe care îl veți afișa în listă (aici introduc intervalul A2: A11);
  • 3.2 În ListStyle selectați 1 - fmList StyleOption;
  • 3.3 În Selectare multipla selectați 1 - fmMultiSelectMulti;
  • 3.4 Închideți Proprietăţi căsuță de dialog. Vedeți captura de ecran:

B: Denumiți celula în care veți localiza elementele selectate

Dacă trebuie să trimiteți toate elementele selectate într-o celulă specificată, cum ar fi E4, vă rugăm să procedați după cum urmează.

1. Selectați celula E4, introduceți ListBoxOutput în Cutie de nume și apăsați tasta Intrați cheie.

C. Introduceți o formă pentru a ajuta la afișarea elementelor selectate

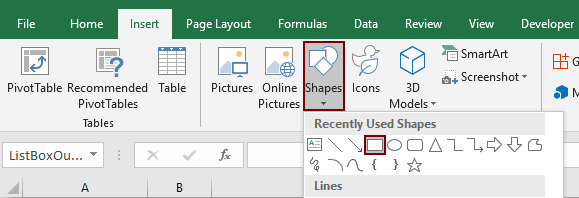
1. clic Insera > Forme > Dreptunghi. Vedeți captura de ecran:

2. Desenați un dreptunghi în foaia de lucru (aici desenez dreptunghiul din celula C4). Apoi faceți clic dreapta pe dreptunghi și selectați Atribuiți macro din meniul cu clic dreapta.

3. În Atribuiți macro , faceți clic pe Nou butonul.

4. În deschidere Microsoft Visual Basic pentru aplicații fereastra, înlocuiți codul original din Module fereastra cu codul VBA de mai jos.

Cod VBA: creați o listă cu mai multe casete de selectare

Sub Rectangle1_Click()
'Updated by Extendoffice 20200730
Dim xSelShp As Shape, xSelLst As Variant, I, J As Integer
Dim xV As String
Set xSelShp = ActiveSheet.Shapes(Application.Caller)
Set xLstBox = ActiveSheet.ListBox1
If xLstBox.Visible = False Then
    xLstBox.Visible = True
    xSelShp.TextFrame2.TextRange.Characters.Text = "Pickup Options"
    xStr = ""
    xStr = Range("ListBoxOutput").Value
    
    If xStr <> "" Then
         xArr = Split(xStr, ";")
    For I = xLstBox.ListCount - 1 To 0 Step -1
        xV = xLstBox.List(I)
        For J = 0 To UBound(xArr)
            If xArr(J) = xV Then
              xLstBox.Selected(I) = True
              Exit For
            End If
        Next
    Next I
    End If
Else
    xLstBox.Visible = False
    xSelShp.TextFrame2.TextRange.Characters.Text = "Select Options"
    For I = xLstBox.ListCount - 1 To 0 Step -1
        If xLstBox.Selected(I) = True Then
        xSelLst = xLstBox.List(I) & ";" & xSelLst
        End If
    Next I
    If xSelLst <> "" Then
        Range("ListBoxOutput") = Mid(xSelLst, 1, Len(xSelLst) - 1)
    Else
        Range("ListBoxOutput") = ""
    End If
End If
End Sub

Notă: În cod, Dreptunghi1 este numele formei; ListBox1 este numele casetei de listă; Selectati optiunile și Opțiuni de preluare sunt textele afișate ale formei; si ListBoxOutput este numele intervalului celulei de ieșire. Le puteți schimba în funcție de nevoile dvs.

5. presa Alt + Q tastele simultan pentru a închide Microsoft Visual Basic pentru aplicații fereastră.

6. Faceți clic pe butonul dreptunghiular va plia sau extinde caseta listă. Când caseta de listă se extinde, bifând articolele din caseta de listă, apoi faceți clic din nou pe dreptunghi pentru a afișa toate elementele selectate în celula E4. Vedeți mai jos demonstrația:

7. Și apoi salvați registrul de lucru ca Cartea de lucru Excel MacroEnable pentru refolosirea codului în viitor.


Creați o listă verticală cu casete de selectare cu un instrument uimitor

Metoda de mai sus este prea multistep pentru a fi ușor de manipulat. Aici recomandăm cu tărie Listă derulantă cu casete de selectare utilitatea Kutools pentru Excel pentru a vă ajuta să creați cu ușurință o listă verticală cu casete de selectare într-un interval specificat, foaia de lucru curentă, registrul de lucru curent sau toate registrele de lucru deschise în funcție de nevoile dvs. Vedeți demo-ul de mai jos:
Descărcați și încercați acum! (traseu gratuit de 30 de zile)

Pe lângă demonstrația de mai sus, oferim și un ghid pas cu pas pentru a demonstra cum să aplicați această caracteristică pentru a realiza această sarcină. Vă rugăm să faceți următoarele.

1. Deschideți foaia de lucru pe care ați setat lista verticală de validare a datelor, faceți clic pe Kutools > Lista verticală > Listă derulantă cu casete de selectare > Setări. Vedeți captura de ecran:

2. În Listă derulantă cu setările casetelor de selectare casetă de dialog, vă rugăm să configurați după cum urmează.

  • 2.1) În Aplica pentru secțiunea, specificați domeniul de aplicare în care veți crea casete de selectare pentru elementele din lista derulantă. Puteți specifica un anumită gamă, foaia de lucru curentă, registrul de lucru curent or toate registrele de lucru deschise în funcție de nevoile dumneavoastră.
  • 2.2) În mod secțiunea, alegeți un stil pe care doriți să-l scoateți în evidență elementele selectate;
  • Aici ia Modifica opțiune ca exemplu, dacă alegeți acest lucru, valoarea celulei va fi modificată pe baza elementelor selectate.
  • 2.3) În Separator caseta, introduceți un delimitator pe care îl veți utiliza pentru a separa mai multe elemente;
  • 2.4) În Direcția textului secțiune, selectați o direcție de text în funcție de nevoile dvs.;
  • 2.5) Faceți clic pe OK butonul.

3. Ultimul pas, faceți clic pe Kutools > Lista verticală > Listă derulantă cu casete de selectare > Activați lista drop-down a casetelor de selectare pentru a activa această caracteristică.

De acum înainte, când faceți clic pe celulele cu lista derulantă într-un domeniu de aplicare specificat, va apărea o casetă listă, selectați elementele bifând casetele de selectare pentru a ieși în celulă, așa cum se arată în demonstrația de mai jos (Luați modul de modificare ca exemplu ).

Pentru mai multe detalii despre această caracteristică, vă rugăm să vizitați aici.

  Dacă doriți să aveți o perioadă de încercare gratuită (30 de zile) a acestui utilitar, vă rugăm să faceți clic pentru a-l descărca, și apoi mergeți pentru a aplica operația conform pașilor de mai sus.


Legate de articole:

Completați automat când tastați în lista verticală Excel
Dacă aveți o listă derulantă de validare a datelor cu valori mari, trebuie să derulați în jos în listă doar pentru a o găsi pe cea potrivită sau să tastați întregul cuvânt direct în caseta de listă. Dacă există o metodă pentru a permite completarea automată la introducerea primei litere din lista derulantă, totul va deveni mai ușor. Acest tutorial oferă metoda de rezolvare a problemei.

Creați o listă verticală dintr-un alt registru de lucru în Excel
Este destul de ușor să creați o listă verticală de validare a datelor printre foile de lucru dintr-un registru de lucru. Dar dacă datele listei de care aveți nevoie pentru validarea datelor se află într-un alt registru de lucru, ce ați face? În acest tutorial, veți afla cum să creați o listă de eliminare dintr-un alt registru de lucru în Excel în detalii.

Creați o listă drop-down căutabilă în Excel
Pentru o listă verticală cu numeroase valori, găsirea unuia corect nu este o lucrare ușoară. Anterior, am introdus o metodă de completare automată a listei derulante atunci când introduceți prima literă în caseta derulantă. Pe lângă funcția de completare automată, puteți face ca lista derulantă să poată fi căutată pentru îmbunătățirea eficienței de lucru în găsirea valorilor corespunzătoare în lista derulantă. Pentru ca lista derulantă să poată fi căutată, încercați metoda din acest tutorial.

Completați automat alte celule atunci când selectați valorile din lista verticală Excel
Să presupunem că ați creat o listă derulantă pe baza valorilor din intervalul de celule B8: B14. Când selectați orice valoare din lista derulantă, doriți ca valorile corespunzătoare din intervalul de celule C8: C14 să fie populate automat într-o celulă selectată. Pentru rezolvarea problemei, metodele din acest tutorial vă vor face o favoare.

Mai multe tutoriale pentru lista derulantă ...

Cele mai bune instrumente de productivitate de birou

🤖 Kutools AI Aide: Revoluționați analiza datelor pe baza: Execuție inteligentă   |  Generați codul  |  Creați formule personalizate  |  Analizați datele și generați diagrame  |  Invocați funcțiile Kutools...
Caracteristici populare: Găsiți, evidențiați sau identificați duplicatele   |  Ștergeți rândurile goale   |  Combinați coloane sau celule fără a pierde date   |   Rundă fără Formula ...
Super căutare: VLookup cu mai multe criterii    VLookup cu valori multiple  |   VLookup pe mai multe foi   |   Căutare fuzzy ....
Listă derulantă avansată: Creați rapid o listă derulantă   |  Listă drop-down dependentă   |  Listă derulantă cu selectare multiplă ....
Manager de coloane: Adăugați un număr specific de coloane  |  Mutați coloanele  |  Comutați starea vizibilității coloanelor ascunse  |  Comparați intervale și coloane ...
Caracteristici prezentate: Focus pe grilă   |  Vedere de proiectare   |   Big Formula Bar    Manager registru de lucru și foi   |  Biblioteca de resurse (Text automat)   |  Data Picker   |  Combinați foi de lucru   |  Criptare/Decriptare celule    Trimiteți e-mailuri după listă   |  Super Filtru   |   Filtru special (filtrează bold/italic/barat...) ...
Top 15 seturi de instrumente12 Text Instrumente (Adăuga text, Eliminați caractere,...)   |   50+ Diagramă Tipuri de (Gantt Chart,...)   |   40+ Practic Formule (Calculați vârsta pe baza zilei de naștere,...)   |   19 inserare Instrumente (Introduceți codul QR, Inserați imaginea din cale,...)   |   12 Convertire Instrumente (Numere la cuvinte, conversie valutara,...)   |   7 Merge & Split Instrumente (Rânduri combinate avansate, Celule divizate,...)   |   ... și altele

Îmbunătățiți-vă abilitățile Excel cu Kutools pentru Excel și experimentați eficiența ca niciodată. Kutools pentru Excel oferă peste 300 de funcții avansate pentru a crește productivitatea și a economisi timp.  Faceți clic aici pentru a obține funcția de care aveți cea mai mare nevoie...

Descriere


Fila Office aduce interfața cu file în Office și vă face munca mult mai ușoară

  • Activați editarea și citirea cu file în Word, Excel, PowerPoint, Publisher, Access, Visio și Project.
  • Deschideți și creați mai multe documente în filele noi ale aceleiași ferestre, mai degrabă decât în ​​ferestrele noi.
  • Vă crește productivitatea cu 50% și reduce sute de clicuri de mouse pentru dvs. în fiecare zi!
Comments (70)
No ratings yet. Be the first to rate!
This comment was minimized by the moderator on the site
Hello-

This is fabulous, but I was wondering if there is a way to call the code as a subroutine, ie Click Button 1, run this code with X List Box and X Output cell. I want to pass the listbox and the output cell as variables into this code. Any help would be greatly appreciated.

I've tried this:
Private Sub Rectangle1_Click()
Call MultiSelctDropdown(ListBox1,Output1)
End Sub

Private Sub Rectangle2_Click()
Call MultiSelctDropdown(ListBox2,Output2)
End Sub

Private Sub MultiSelectDropdown(ListBox As String, Output As String)
Dim xSelShp As Shape, xSelLst As Variant, I, J As Integer
Dim xV As String
Set xSelShp = ActiveSheet.Shapes(Application.Caller)
Set xLstBox = ActiveSheet.ListBox
If xLstBox.Visible = False Then
xLstBox.Visible = True
xSelShp.TextFrame2.TextRange.Characters.Text = "Enter"
xStr = ""
xStr = Range("Output").Value

If xStr <> "" Then
xArr = Split(xStr, ",")
For I = xLstBox.ListCount - 1 To 0 Step -1
xV = xLstBox.List(I)
For J = 0 To UBound(xArr)
If xArr(J) = xV Then
xLstBox.Selected(I) = True
Exit For
End If
Next
Next I
End If
Else
xLstBox.Visible = False
xSelShp.TextFrame2.TextRange.Characters.Text = "Click Here to Select Products"
For I = xLstBox.ListCount - 1 To 0 Step -1
If xLstBox.Selected(I) = True Then
xSelLst = xLstBox.List(I) & "," & xSelLst
End If
Next I
If xSelLst <> "" Then
Range("Output") = Mid(xSelLst, 1, Len(xSelLst) - 1)
Else
Range("Output") = ""
End If
End If
End Sub
This comment was minimized by the moderator on the site
Ok I figured this one out (see below)

But now I want to have only ONE list box that I can use over and over again with different buttons but different output depending on the button pushed. And the code below works for this EXCEPT the items selected when the list box pops up includes all items that have been outputted from the code.

If list box1 contains

Apples
Oranges
Pears
Kiwi

and button 1 is pressed and Apples is selected, when button 2 is pressed Apples is already selected, and if during button press 2 pears is selected when you go back to button 1 Apples AND Pears are selected.

How can I either clear all selected when a button is pressed OR make the selected options equal to the output.


Private Sub Button1_Click()
Call ProductSelection(ActiveSheet.ListBox1, "Button1Output", 243, 215)
End Sub
Private Sub Button2_Click()
Call ProductSelection(ActiveSheet.ListBox1, "Button2Output", 472, 215)
End Sub


Private Sub ProductSelection(xListBox As Object, Output As String, left As Integer, height As Integer)
Dim xSelShp As Shape, xSelLst As Variant, I, J As Integer
Dim xV As String
Set xSelShp = ActiveSheet.Shapes(Application.Caller)
Set xLstBox = xListBox
If xLstBox.Visible = False Then
xLstBox.Visible = True
xLstBox.left = left
xLstBox.height = height
xSelShp.TextFrame2.TextRange.Characters.Text = "Enter"
xStr = ""
xStr = Range(Output).Value

If xStr <> "" Then
xArr = Split(xStr, ",")
For I = xLstBox.ListCount - 1 To 0 Step -1
xV = xLstBox.List(I)
For J = 0 To UBound(xArr)
If xArr(J) = xV Then
xLstBox.Selected(I) = True
Exit For
End If
Next
Next I
End If
Else
xLstBox.Visible = False
xSelShp.TextFrame2.TextRange.Characters.Text = "Click Here to Select Products"
For I = xLstBox.ListCount - 1 To 0 Step -1
If xLstBox.Selected(I) = True Then
xSelLst = xLstBox.List(I) & "," & xSelLst
End If
Next I
If xSelLst <> "" Then
Range(Output) = Mid(xSelLst, 1, Len(xSelLst) - 1)
Else
Range(Output) = ""
End If
End If
End Sub
This comment was minimized by the moderator on the site
Hi there- this is super helpful, thank you! Can you tell me how I can draw a list box based on a list in a different worksheet (but same file)? I've tried entering my worksheet name (i.e., 'lists') followed by the range in the list fill range (after clicking on Properties) but this does not work.Thanks!
This comment was minimized by the moderator on the site
Hi Meghan,Supposing you want to <span style="letter-spacing: 0.2px; color: inherit; font-family: inherit; font-style: inherit; font-variant-ligatures: inherit; font-variant-caps: inherit;">ListBox1</span><span style="letter-spacing: 0.2px; color: inherit; font-family: inherit; font-style: inherit; font-variant-ligatures: inherit; font-variant-caps: inherit;">Sheet1</span><div data-tag="code">Sub listboxlistfillrangefromdifferentsheet()
Sheet1.ListBox1.ListFillRange = Sheet2.Range("A2:A20").Address(, , , True)
End Sub
This comment was minimized by the moderator on the site
hello, I have a problem with the list box: to make the list going down, I have to click on the box that allows the list to go down but when I click, it does not go down automatically, I have to click outside the list so that it refreshes and the list goes down, what to do? Thank you
This comment was minimized by the moderator on the site
Hi,You can't scroll ActiveX Listbox by mouse wheel. There is no setting for it.

This comment was minimized by the moderator on the site
Hi, thank you for sharing this! I have a question though, is it possible to populate different cells based on the selected option?For example, instead of having everything in one cell, each selection is populated in the cell below the earlier selection. Thank you!
This comment was minimized by the moderator on the site
Hi faez,
The VBA below helps to populate the selected options in different cells on the same row. Please have a try.

Sub Rectangle2_Click()
'Updated by Extendoffice 20211124
Dim xSelShp As Shape, xSelLst As Variant, I As Integer
Dim xRg As Range
Set xSelShp = ActiveSheet.Shapes(Application.Caller)
Set xLstBox = ActiveSheet.ListBox1
If xLstBox.Visible = False Then
xLstBox.Visible = True
xSelShp.TextFrame2.TextRange.Characters.Text = "Pickup Options"
Else
xLstBox.Visible = False
xSelShp.TextFrame2.TextRange.Characters.Text = "Select Options"
Set xRg = Range("ListBoxOutput")
For I = 0 To xLstBox.ListCount - 1
If xLstBox.Selected(I) = True Then
xSelLst = xLstBox.List(I)
xRg.Value = Mid(xSelLst, 1, Len(xSelLst))
Set xRg = xRg.Offset(0, 1)
End If
Next I
End If
End Sub
This comment was minimized by the moderator on the site
Hi Crystal,
Thanks a lot for this code, very helpful and convenient. One question : how to adpat it in order not to have the separator ";" if only one item is selected ?
This comment was minimized by the moderator on the site
Hi Eloi,No separator is displayed when you select only one item in the list.
This comment was minimized by the moderator on the site
Thanks Crystal, the mistake was in my adaptation of the code.
If someone needs to adapt it with a click on a cell instead of a click on a shape, you could try this (with a call to this sub in your sheet, with a condition when your cell is selected)

Sub affichage_liste(xLstBox As MSForms.ListBox, texte1 As String)
'Updated by Extendoffice 20200730
Dim xSelLst As Variant, I, J As Integer
Dim xV As String

If xLstBox.Visible = False Then
xLstBox.Visible = True
xStr = ""
xStr = Range(texte1).Value

If xStr <> "" Then
xArr = Split(xStr, ";")
For I = xLstBox.ListCount - 1 To 0 Step -1
xV = xLstBox.List(I)
For J = 0 To UBound(xArr)
If xArr(J) = xV Then
xLstBox.Selected(I) = True
Exit For
End If
Next
Next I
End If
Else
xLstBox.Visible = False
For I = xLstBox.ListCount - 1 To 0 Step -1
If xLstBox.Selected(I) = True Then
xSelLst = xLstBox.List(I) & "; " & xSelLst
End If
Next I
If xSelLst <> "" Then
Range(texte1) = Mid(xSelLst, 1, Len(xSelLst) - 2)
Else
Range(texte1) = ""
End If
End If
End Sub
This comment was minimized by the moderator on the site
Hi Eloi,The code you provided doesn't seem to work. I have modified it again as below.  After adding the code in your Sheet(Code) window, go back to the worksheet, click the cell C4 to expand the list box, after selecting items from the list box, click on any cell in the worksheet to output the selection, and no separator is displayed when you select only one item in the list.
<div data-tag="code">Private Sub Worksheet_SelectionChange(ByVal Target As Range)
'Updated by Extendoffice 20211223
Dim xSelLst As Variant, I, J As Integer
Dim xV As String
Set xLstBox = ActiveSheet.ListBox1

If Target.Address = "$C$4" Then


If xLstBox.Visible = False Then
xLstBox.Visible = True
xStr = ""
xStr = Range("ListBoxOutput").Value

If xStr <> "" Then
xArr = Split(xStr, ";")
For I = xLstBox.ListCount - 1 To 0 Step -1
xV = xLstBox.List(I)
For J = 0 To UBound(xArr)
If xArr(J) = xV Then
xLstBox.Selected(I) = True
Exit For
End If
Next
Next I
End If

End If

Else
xLstBox.Visible = False

For I = xLstBox.ListCount - 1 To 0 Step -1
If xLstBox.Selected(I) = True Then
xSelLst = xLstBox.List(I) & "; " & xSelLst
End If
Next I
If xSelLst <> "" Then
Range("ListBoxOutput") = Mid(xSelLst, 1, Len(xSelLst) - 2)
Else
Range("ListBoxOutput") = ""
End If


End If

End Sub
This comment was minimized by the moderator on the site
Thanks a lot Crystal
This comment was minimized by the moderator on the site
Bonjour,Je suis plus que novice sur excel étant sur mac je ne peux utiliser l'outil Kutools j'ai donc tenté de créer une liste déroulante où l'on peut cocher plusieurs items mais je bloque dès le début dans l'onglet développeur puisque je n'ai pas du tout l'outil "insert".Merci pour votre aide
This comment was minimized by the moderator on the site
Hi I am newbie to VBA. I tried to execute the code but i get the following error "Run-time error '-2147024809 (80070057)': The Item with the specified name wasn't found". Can you help me with this
This comment was minimized by the moderator on the site
Hi Gowtham,It seem that this error occurs when you running the code directly in the Code editor (the Microsoft Visual Basic for Applications window).After adding the code, please press the Alt + Q keys to close the Microsoft Visual Basic for Applications window. Go back to the worksheet and execute the code by clicking the rectangle button (see the .gif picture in step 6).
This comment was minimized by the moderator on the site
Hi Crystal, even after your tip am getting same error as Gowtham. My error is right after protect my sheet. Would you please help me with this issue?
This comment was minimized by the moderator on the site
Hi Crystal, Even After your tip I am getting same error as Gowtham.
This comment was minimized by the moderator on the site
Hi Mina,Which Excel and Windows version are you using?
This comment was minimized by the moderator on the site
Hello,I added this code to an existing macro template and it is loading the selections correctly, but it is NOT clearing out the x on the selected items..This will be used on/in a template worksheet that has submit button/macro to load the worksheet answers into a hidden worksheet with a data table.And am happy to say the field data loaded to the cell, transferred into my variable, and loaded to the data table as expected.
This code was a HUGE blessing!
I use excel 2016
How do I fix this. I am using this version from below.
Sub Rectangle1_Click()
'Updated by Extendoffice 20200730
Dim xSelShp As Shape, xSelLst As Variant, I, J As Integer
Dim xV As String
Set xSelShp = ActiveSheet.Shapes(Application.Caller)
Set xLstBox = ActiveSheet.ListBox1
If xLstBox.Visible = False Then
xLstBox.Visible = True
xSelShp.TextFrame2.TextRange.Characters.Text = "Pickup Options"
xStr = ""
xStr = Range("ListBoxOutput").Value

If xStr <> "" Then
xArr = Split(xStr, ";")
For I = xLstBox.ListCount - 1 To 0 Step -1
xV = xLstBox.List(I)
For J = 0 To UBound(xArr)
If xArr(J) = xV Then
xLstBox.Selected(I) = True
Exit For
End If
Next
Next I
End If
Else
xLstBox.Visible = False
xSelShp.TextFrame2.TextRange.Characters.Text = "Select Options"
For I = xLstBox.ListCount - 1 To 0 Step -1
If xLstBox.Selected(I) = True Then
xSelLst = xLstBox.List(I) & ";" & xSelLst
End If
Next I
If xSelLst <> "" Then
Range("ListBoxOutput") = Mid(xSelLst, 1, Len(xSelLst) - 1)
Else
Range("ListBoxOutput") = ""
End If
End If
End Sub
This comment was minimized by the moderator on the site
Hello,

I'm having a similar problem to Tom from 2 months ago. When I try to share my file with a colleague, the multi-select droplist list isn't working. However, I used the Kutools add-on to create this as opposed to creating it myself. I've also saved it as macro-enabled.
This comment was minimized by the moderator on the site
Hi ben,The multi-select drop down list feature of Kutools only works in the Excel that installed our Kutools. We are working on this issue, sorry for the inconvenience.
This comment was minimized by the moderator on the site
Hello I looking the resolve for problem with saving choosing on drop down list

when i choose something on list and send file to my colleague, then when he open file and want to check my list then list has cleared and cell "ListBoxOutput" was cleared too.

help please :)
This comment was minimized by the moderator on the site
Hi Tom,
Please save the workbook as an "Excel MacroEnable Workbook" and then send this .xlsm file to your colleague.
This comment was minimized by the moderator on the site
hello i save this file in this format from beginning ;), but without effect. still when i fill file and send to someone then when he opened file and click to "shape" then macro started from begin and cleared list
This comment was minimized by the moderator on the site
Hi Tom,
I am sorry for the mistake. The code has been updated again. Please have a try.

Sub Rectangle1_Click()

'Updated by Extendoffice 20200730

Dim xSelShp As Shape, xSelLst As Variant, I, J As Integer

Dim xV As String

Set xSelShp = ActiveSheet.Shapes(Application.Caller)

Set xLstBox = ActiveSheet.ListBox1

If xLstBox.Visible = False Then

xLstBox.Visible = True

xSelShp.TextFrame2.TextRange.Characters.Text = "Pickup Options"

xStr = ""

xStr = Range("ListBoxOutput").Value


If xStr <> "" Then

xArr = Split(xStr, ";")

For I = xLstBox.ListCount - 1 To 0 Step -1

xV = xLstBox.List(I)

For J = 0 To UBound(xArr)

If xArr(J) = xV Then

xLstBox.Selected(I) = True

Exit For

End If

Next

Next I

End If

Else

xLstBox.Visible = False

xSelShp.TextFrame2.TextRange.Characters.Text = "Select Options"

For I = xLstBox.ListCount - 1 To 0 Step -1

If xLstBox.Selected(I) = True Then

xSelLst = xLstBox.List(I) & ";" & xSelLst

End If

Next I

If xSelLst <> "" Then

Range("ListBoxOutput") = Mid(xSelLst, 1, Len(xSelLst) - 1)

Else

Range("ListBoxOutput") = ""

End If

End If

End Sub
This comment was minimized by the moderator on the site
Now it's working perfectly.

Many thanks for your help
There are no comments posted here yet
Load More
Please leave your comments in English
Posting as Guest
×
Rate this post:
0   Characters
Suggested Locations