Cum să imprimați automat atașamentele când sosesc e-mailurile în Outlook?
Acest tutorial demonstrează o metodă de a combina un script VBA și o regulă Outlook pentru a vă ajuta să imprimați automat atașamentele anumitor e-mailuri atunci când ajung în Outlook.
Imprimați automat atașamentele când sosesc anumite e-mailuri
Să presupunem că doriți să imprimați automat atașamentele e-mailurilor primite de la un anumit expeditor. Puteți face după cum urmează pentru a finaliza.
Pasul 1: Creați un script în Outlook
În primul rând, trebuie să creați un script VBA în Outlook.
1. Lansați Outlook, apăsați butonul Alt + F11 tastele simultan pentru a deschide Microsoft Visual Basic pentru aplicații fereastră.
2. În Microsoft Visual Basic pentru aplicații fereastra, faceți dublu clic pe Project1 > Obiecte Microsoft Outlook > Această sesiune Outlook pentru a deschide ThisOutlookSession (Cod) fereastră, apoi copiați următorul cod în această fereastră de cod.
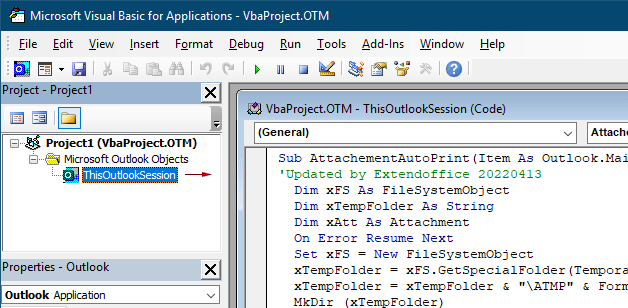
Cod VBA 1: imprimați automat atașamente (toate tipurile de atașamente) când sosesc e-mailurile
Sub AttachementAutoPrint(Item As Outlook.MailItem)
'Updated by Extendoffice 20230223
  Dim xFS As FileSystemObject
  Dim xTempFolder As String
  Dim xAtt As Attachment
  Dim xShell As Object
  Dim xFolder As Object, xFolderItem As Object
  Dim xFileName As String
  On Error GoTo xError
  If Item.Attachments.Count = 0 Then Exit Sub
  Set xFS = New FileSystemObject
  xTempFolder = xFS.GetSpecialFolder(TemporaryFolder)
  xTempFolder = xTempFolder & "\ATMP" & Format(Item.ReceivedTime, "yyyymmddhhmmss")
  If Not xFS.FolderExists(xTempFolder) Then
    MkDir (xTempFolder)
  End If
  Set xShell = CreateObject("Shell.Application")
  Set xFolder = xShell.NameSpace(0)
  For Each xAtt In Item.Attachments
    If IsEmbeddedAttachment(xAtt) = False Then
      xFileName = xTempFolder & "\" & xAtt.FileName
      xAtt.SaveAsFile (xFileName)
      Set xFolderItem = xFolder.ParseName(xFileName)
      xFolderItem.InvokeVerbEx ("print")
    End If
  Next xAtt
  Set xFS = Nothing
  Set xFolder = Nothing
  Set xFolderItem = Nothing
  Set xShell = Nothing
xError:
  If Err <> 0 Then
    MsgBox Err.Number & " - " & Err.Description, , "Kutools for Outlook"
    Err.Clear
  End If
Exit Sub
End Sub

Function IsEmbeddedAttachment(Attach As Attachment)
Dim xItem As MailItem
Dim xCid As String
Dim xID As String
Dim xHtml As String
On Error Resume Next
IsEmbeddedAttachment = False
Set xItem = Attach.Parent
If xItem.BodyFormat <> olFormatHTML Then Exit Function
xCid = ""
xCid = Attach.PropertyAccessor.GetProperty("http://schemas.microsoft.com/mapi/proptag/0x3712001F")
If xCid <> "" Then
    xHtml = xItem.HTMLBody
    xID = "cid:" & xCid
    If InStr(xHtml, xID) > 0 Then
        IsEmbeddedAttachment = True
    End If
End If
End Function
Notă: Acest cod acceptă imprimarea tuturor tipurilor de atașamente primite în e-mailuri. Dacă doriți să imprimați numai tipul specificat de atașament, cum ar fi fișierele pdf, vă rugăm să aplicați următorul cod VBA.
Cod VBA 2: imprimați automat tipul specificat de atașamente atunci când sosesc e-mailurile
Sub AttachementAutoPrint(Item As Outlook.MailItem)
'Updated by Extendoffice 20230223
  Dim xFS As FileSystemObject
  Dim xTempFolder As String
  Dim xAtt As Attachment
  Dim xShell As Object
  Dim xFolder As Object, xFolderItem As Object
  Dim xFileType As String, xFileName As String
  On Error GoTo xError
  If Item.Attachments.Count = 0 Then Exit Sub
  Set xFS = New FileSystemObject
  xTempFolder = xFS.GetSpecialFolder(TemporaryFolder)
  xTempFolder = xTempFolder & "\ATMP" & Format(Item.ReceivedTime, "yyyymmddhhmmss")
  If Not xFS.FolderExists(xTempFolder) Then
    MkDir (xTempFolder)
  End If
  Set xShell = CreateObject("Shell.Application")
  Set xFolder = xShell.NameSpace(0)
  For Each xAtt In Item.Attachments
    If IsEmbeddedAttachment(xAtt) = False Then
      xFileName = xAtt.FileName
      xFileType = LCase$(Right$(xFileName, VBA.Len(xFileName) - VBA.InStrRev(xFileName, ".")))
      xFileName = xTempFolder & "\" & xFileName
      Select Case xFileType
        Case "pdf"   'change "pdf" to the file extension you want to print
          xAtt.SaveAsFile (xFileName)
          Set xFolderItem = xFolder.ParseName(xFileName)
          xFolderItem.InvokeVerbEx ("print")
      End Select
    End If
  Next xAtt
  Set xFS = Nothing
  Set xFolder = Nothing
  Set xFolderItem = Nothing
  Set xShell = Nothing
xError:
  If Err <> 0 Then
    MsgBox Err.Number & " - " & Err.Description, , "Kutools for Outlook"
    Err.Clear
  End If
  Exit Sub
End Sub

Function IsEmbeddedAttachment(Attach As Attachment)
Dim xItem As MailItem
Dim xCid As String
Dim xID As String
Dim xHtml As String
On Error Resume Next
IsEmbeddedAttachment = False
Set xItem = Attach.Parent
If xItem.BodyFormat <> olFormatHTML Then Exit Function
xCid = ""
xCid = Attach.PropertyAccessor.GetProperty("http://schemas.microsoft.com/mapi/proptag/0x3712001F")
If xCid <> "" Then
    xHtml = xItem.HTMLBody
    xID = "cid:" & xCid
    If InStr(xHtml, xID) > 0 Then
        IsEmbeddedAttachment = True
    End If
End If
End Function
notițe:
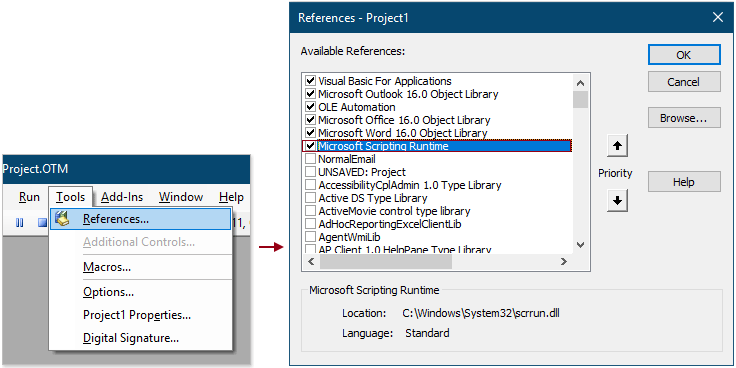
3. Continuați și faceți clic Instrumente > Referințe. În pop-up Referințe – Proiect1 caseta de dialog, verificați Runtime Microsoft Scripting , apoi faceți clic pe OK butonul.
4. Salvați codul și apăsați tasta Alt + Q tastele pentru a închide Microsoft Visual Basic pentru aplicații fereastră.
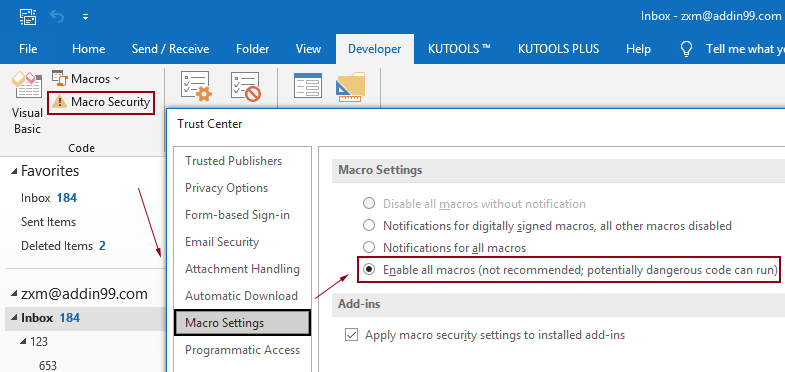
Notă: Vă rugăm să vă asigurați că Activați toate macrocomenzile opțiunea este activată în Outlook. Puteți verifica această opțiune urmând pașii de mai jos.
Pasul 2: Creați o regulă pentru a utiliza scriptul
După ce adăugați scriptul VBA în Outlook, trebuie să creați o regulă pentru a utiliza scriptul pe baza anumitor condiții.
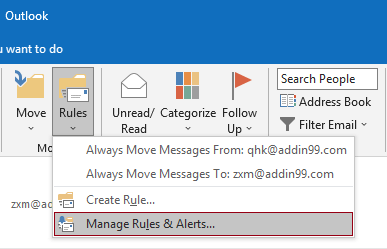
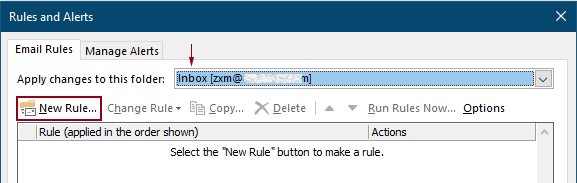
1. Accesați fila Acasă, faceți clic Reguli > Gestionați regulile și alertele.
2. În Reguli și alerte , faceți clic pe Noua regulă pentru a crea o regulă.
Sfat: Dacă ați adăugat mai multe conturi de e-mail în Outlook, vă rugăm să specificați un cont în Aplicați modificări la acest folder lista derulantă în care doriți să aplicați regula. În caz contrar, va fi aplicat în căsuța de e-mail a contului de e-mail selectat în prezent.
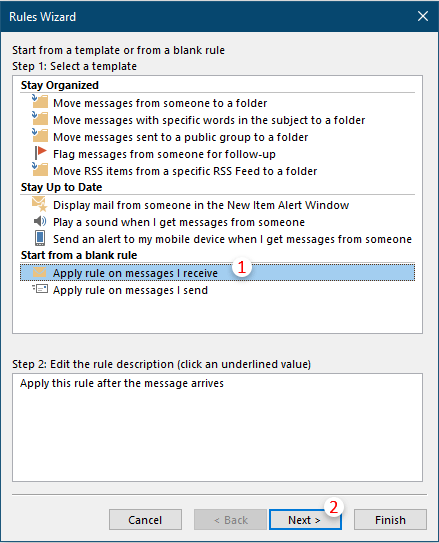
3. În prima Expertul pentru reguli fereastră de dialog, selectați Aplică regulă pe mesajele pe care le primesc în Etapa 1 , apoi faceți clic pe Următorul.
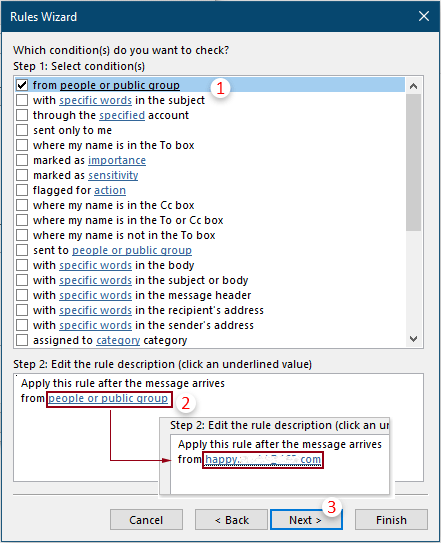
4. În al doilea Expertul pentru reguli casetă de dialog, trebuie să:
5. În al treilea Expertul pentru reguli casetă de dialog, trebuie să configurați după cum urmează.
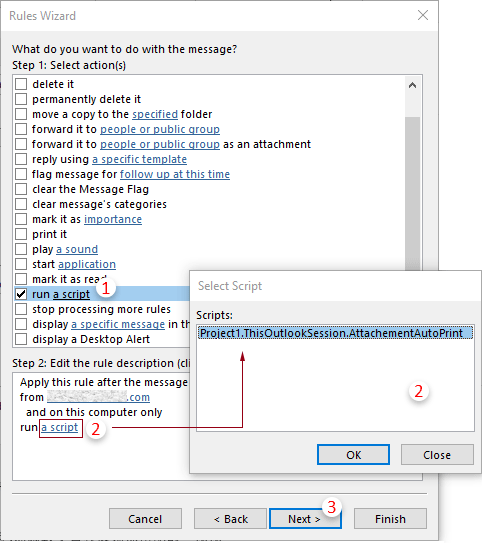
Sfat: Dacă "rulați un script” lipsește opțiunea din dvs Expertul pentru reguli, îl puteți afișa urmând metoda menționată în acest articol: restaurați lipsa Run A Script pption în regula Outlook.
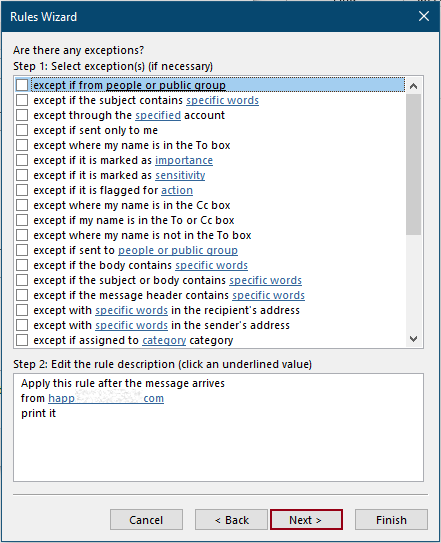
6. Apoi alta Expertul pentru reguli apare cerând excepții. Puteți selecta excepțiile dacă este necesar, în caz contrar, faceți clic pe Pagina Următoare → buton fără nicio selecție。
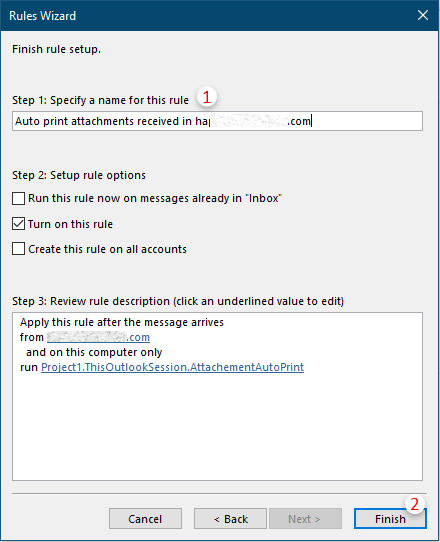
7. În ultimul Expertul pentru reguli, trebuie să specificați un nume pentru regulă, apoi să faceți clic pe finalizarea butonul.
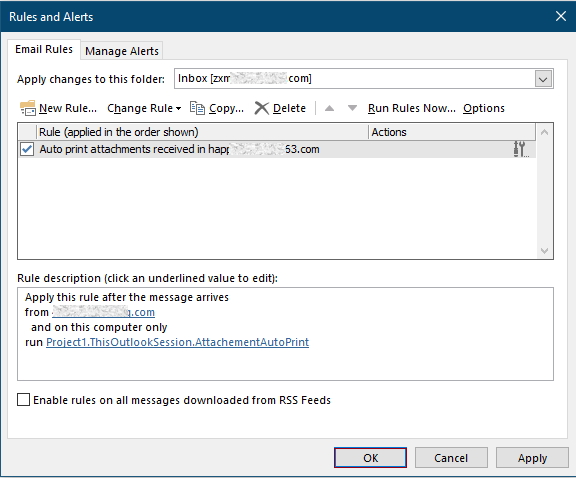
8. Apoi revine la Reguli și alerte caseta de dialog, puteți vedea regula pe care ați creat-o listată în interior, faceți clic pe OK pentru a finaliza toate setările.
De acum înainte, când se primește un e-mail de la persoana specificată, fișierele atașate vor fi tipărite automat.
Articole pe aceeași temă
Imprimați doar atașamentele dintr-un e-mail sau dintr-un e-mail selectat din Outlook
În Outlook, puteți imprima e-mailurile, dar ați imprimat atașamentele doar dintr-un e-mail sau e-mailuri selectate în Outlook? Acest articol prezintă trucurile pentru rezolvarea acestei sarcini.
Imprimați numai antetul mesajului unui e-mail în Outlook
Când imprimați un e-mail în Outlook, acesta va imprima atât antetul mesajului, cât și corpul mesajului în e-mail. Cu toate acestea, în unele cazuri speciale, este posibil să fie nevoie doar să tipăriți antetul mesajului cu subiectul, expeditorul, destinatarii etc. Acest articol va introduce două soluții pentru a face acest lucru.
Imprimați un calendar într-un interval de date specificat/personalizat în Outlook
În mod normal, atunci când imprimați un calendar în vizualizarea Lună în Outlook, acesta va selecta automat luna care conține data selectată curent. Dar, poate fi necesar să tipăriți calendarul într-un interval de date personalizat, cum ar fi 3 luni, jumătate de an etc. Acest articol vă va prezenta soluția.
Imprimați un contact cu imagine în Outlook
În mod normal, imaginea unui contact nu va fi tipărită la imprimarea contactului în Outlook. Dar, uneori, va fi mai impresionant să imprimați un contact cu imaginea sa. Acest articol va introduce câteva soluții pentru a o face.
Imprimați o selecție a unui e-mail în Outlook
Dacă ați primit un mesaj de e-mail și ați descoperit că există o selecție a conținutului de e-mail care trebuie imprimat în loc să imprimați întregul mesaj, ce ați face? De fapt, Outlook vă poate ajuta să realizați această operațiune cu ajutorul browserelor de internet, cum ar fi Firefox și Internet Explorer. Aici voi lua de exemplu browserele de Internet. Vă rugăm să consultați următoarele tutoriale.
Cele mai bune instrumente de productivitate de birou
Kutools pentru Outlook - Peste 100 de funcții puternice pentru a vă supraalimenta Outlook
🤖 AI Mail Assistant: E-mailuri profesionale instantanee cu magie AI--un singur clic pentru răspunsuri geniale, ton perfect, stăpânire în mai multe limbi. Transformați e-mailurile fără efort! ...
📧 Automatizare e-mail: În afara biroului (disponibil pentru POP și IMAP) / Programați trimiterea de e-mailuri / CC/BCC automat după reguli la trimiterea e-mailului / Redirecționare automată (Reguli avansate) / Adăugare automată felicitare / Împărțiți automat e-mailurile cu mai mulți destinatari în mesaje individuale ...
📨 Managementul e-mail: Amintește-ți cu ușurință e-mailurile / Blocați e-mailurile înșelătorii de către subiecți și alții / Ștergeți e-mailurile duplicate / Cautare Avansata / Consolidați foldere ...
📁 Atașamente Pro: Salvați în serie / Detașare lot / Compresă în loturi / Salvare automata / Detașare automată / Comprimare automată ...
🌟 Magia interfeței: 😊Mai multe emoji drăguțe și cool / Îmbunătățiți-vă productivitatea Outlook cu vizualizările cu file / Minimizați Outlook în loc să închideți ...
???? Minuni cu un singur clic: Răspundeți tuturor cu atașamentele primite / E-mailuri anti-phishing / 🕘Afișați fusul orar al expeditorului ...
👩🏼🤝👩🏻 Contacte și calendar: Adăugați în lot contacte din e-mailurile selectate / Împărțiți un grup de contact în grupuri individuale / Eliminați mementouri de ziua de naștere ...
Peste 100 Caracteristici Așteaptă explorarea ta! Click aici pentru a descoperi mai multe.

